Saturday, 11 January 2014

Referencing BOR objects as Class attributes in SAP Workflow.

I was wondering how I can use the BOR (Business Object Repository) attributes as my class attributes so that I can use that in my workflow and thanks to Jocelyn Dart I found a way. You can refer her excellent series of blogs on ABAP OO for workflow in SCN. http://scn.sap.com/community/bpm/business-workflow/blog/2007/07/16/referencing-bor-objects-in-abap-oo-classes  

You can also refer the standard class CL_SWF_FORMABSENC provided by SAP.

Now let’s get started with step by step procedure to refer BOR objects as class attributes. For demo purpose I have used Purchase Order BOR – BUS2012.

1. Execute T-code SE24 and create a new class say ZCL_BOR_ATTRIB.

2. In the interface section of the class, add the interface IF_WORKFLOW. In order to use class methods in the workflow tasks we must have this interface in our class. Once we add this interface BI_OBJECT and BI_PERSISTENT interface automatically appear in the interface section.

3. In the Methods section of the class, below highlighted methods of IF_WORKFLOW interface gets added.

4. Come to Attributes section of the class and create the following attributes.

5. Now we have to create a pre-filled type for the constant attribute and to do so click on the arrow mark against the constant attribute and write the below code marked in the Box.

6. Create a CONSTRUCTOR method by pressing the constructor button in the top right area of the screen and add the parameter EBELN.

7.  In the CONSTRUCTOR method add the below code.

8. In BI_PERSISTENT~FIND_BY_LPOR method write the below code. This method is responsible for passing the values from workflow to class. We are passing the EBELN (Purchase document number) retrieved from workflow to CONSTRUCTOR method here.

9.  In  BI_PERSISTENT~LPOR method pass the attribute M_LPOR to the returning parameter RESULT. This method is responsible for passing the computed values from class back to the workflow.

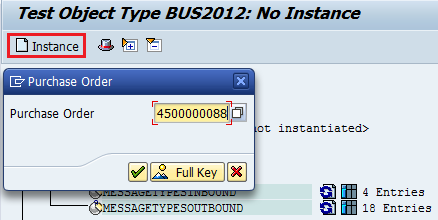
10. Now you can test the class by providing the instance key 4500000088.

11. To check whether the attribute BO_BUS2012 is having the right values or not just click on detail button.

12. Since we can’t use CONSTRUCTOR method in the workflow tasks. We must create a method, which will explicitly instantiates our class ZCL_BOR_ATTRIB. So let’s create a method say CREATE_INSTANCE and the below two parameters.

13. In the CREATE_INSTANCE write the below code.

14. Now go to PFTC T-code create a workflow standard task and include this class method. Don’t forget to mark/enable Synchronous object method and Background processing.

15. To test that workflow task execute the T-code SWUS and input the task number and EBELN value and execute.

16. As soon as you execute the task you will get a status message “Task Started under work item id ******** (current status Ready)". After that, click on Workflow Log.

17. Click on the menu Extras – Container.

18. In the Task Container you will find all the attributes of the BOR-BUS2012.

19. To cross verify the attributes retrieved go to SWO1 (Es Doublew Oh One… J )and execute the BOR-BUS2012 by providing the purchase order number 4500000088.

20. Below are the  BOR BUS2012 attributes and their corresponding values.

Monday, 11 November 2013

SQL Trace Analysis in SAP

From the developer’s perspective, SQL (Structured Query Language) trace helps us to improve the overall performance of the program by understanding the amount of time a particular SELECT statement is taking to fetch the data from the database.

In SQL trace we would see the syntax of the SELECT statement used in ABAP program differs. This is because every time when a SELECT statement executed from SAP end, it gets converted into standard SQL query structure of ORACLE database.


We can take the SQL traces through the transactions: ST12/STAD/ST05/ST04/ST30. Now let’s see how to take the traces through the T-code ST12.

1. Run the T-Code ST12 and click on Current mode.


2. Provide the Program name for which you want to take the trace and execute the program. If you want to take the traces of a function module then select Transaction radio button and specify the T-code SE37, it will take to the Function Module Builder and then give the FM name and Execute. After the execution click on Full screen.


3. Select the trace against your user Id and Comment and click on SQL Trace Summary.


4. Now you will see all the SELECT statements used in the program and their duration. If you want to get into the depth of the SQL statement click on EXPLAIN TOOL.


5. The EXPLAIN TOOL displays the execution plan for a SQL statement. It gives the technical info about how the table was accessed and the Key/Secondary index it used to retrieve the table contents.


Sometimes in execution plan for a SQL statement, you might encounter a scenario wherein the system is performing full table scan to retrieve the contents by ignoring secondary index. This is because the CBO (Oracle's cost-based SQL optimizer) calculates that the cost (time) required to perform the full table scan is less than the cost of retrieving the table contents using the secondary index.

In such scenarios we have to use ABAP hints along with the SELECT query. ABAP hints forces the CBO to consider the secondary index while retrieving the table contents. The syntax of ABAP Hint is as follows:
%_HINTS ORACLE 'INDEX("<Table Name>" "<Table Name>~<Index Id>")'


For example, suppose we have to retrieve the entries from MARA table based on Material Type (MTART). Since MTART is not a primary key, we will create a secondary index for this key. After creating the index we need to update the STATISTICS with the help of basis team so that it gets reflected in ORACLE database. Then in the SELECT statement we must use ABAP Hints.


SELECT * FROM MARA
                INTO IT_MARA
    WHERE MTART  EQ ‘COUP’
    %_HINTS ORACLE 'INDEX("MARA" "MARA~T")'.

Please note even if the syntax of Hints used with SELECT is incorrect, system will not throw any errors.


We can use the EXPLAIN tool even through the transaction ST04.


We can take the SQL traces even using T-codes ST05/STAD.


As highlighted in the screen shot above, the different operations performed while executing the SELECT statements are:

PREPARE: Indicates the conversion of ABAP SELECT statement into ORACLE SQL statement.

OPEN: A cursor (logical entity) is assigned to a SQL statement which acts as a tunnel between SAP and ORACLE to access the table contents by passing the parameters such as the table fields and the key used to access the table.

FETCH: Retrieves table entries from the database.

REOPEN: Specifies that the declared cursor is used again by passing different parameters.

EXEC: Denotes INSERT/DELETE/UPDATE statement is executed.

REEXEC: Indicates same INSERT/DELETE/UPDATE statement is executed again.

EXECSTA: Specifies COMMIT WORK is performed.

Thursday, 19 September 2013

ZSAPLINK Program Usage


ZSAPLINK program facilitates us to import/export object/objects from one server to another server, in the form of file with extension type (.nugg/.slnk)

Suppose you want to move some of the objects (Programs/Class/Data Element /Domain/ Index/ Tables/View…) in one server say DEV1 to another server say DEV2 then you can easily accomplish this task with the help of ZSAPLINK program without wasting your time in copy and pasting each object from source to destination J

You can download the latest version of the SAPlink installer zip file from the saplink website https://www.assembla.com/spaces/saplink/documents and after successful implementation you must have the following classes in Class builder (SE24) along with the main program ZSAPLINK in ABAP editor (SE38).

  • ZSAPLINK
  • ZCX_SAPLINK                     
  • ZSAPLINK_CLASS               
  • ZSAPLINK_DATA_ELEMENTS       
  • ZSAPLINK_DOMAINS
  • ZSAPLINK_FUNCTIONGROUP             
  • ZSAPLINK_INDEX               
  • ZSAPLINK_LOCK_OBJECTS        
  • ZSAPLINK_NUGGET               
  • ZSAPLINK_PROGRAM             
  • ZSAPLINK_SEARCH_HELPS        
  • ZSAPLINK_TABLE_TECH_SETTINGS 
  • ZSAPLINK_TABLE_TYPES         
  • ZSAPLINK_TABLES              
  • ZSAPLINK_VIEW_TECH_SETTINGS  
  • ZSAPLINK_VIEWS               
  • ZSAPLINK_WD_APPLICATION      
  • ZSAPLINK_WD_COMPONENT        
  • ZSAPLINK_WD_CONFIG_APPL      
  • ZSAPLINK_WD_CONFIG_COMP


1. Points to Remember: 
  • In order to export/import both the systems (Source/Destination) must have ZSAPLINK program.
  • By default objects will be in ‘Inactive’ state after importing to destination server.
  • Manually we need to activate the imported objects.
  • By default imported objects will be in $TMP folder.


2. Definitions:

Nuggets: Nuggets enable multiple objects to be imported/exported in one file (.nugg).
Slinkee: A Slinkee enables single objects to be imported or exported in one file (.slnk).  

3. Program Flow:

The below screen appears when you execute the ZSAPLINK program with two tabs Nugget and Slinkee.


3.1 Using Nuggets: 

Consider the scenario wherein we have to export the objects from source and import the same to destination. 

3.1.1 Exporting Objects:

1. First we have to create a nugget file before adding the objects.  Select Create New Nugget and provide the nugget name and execute.


2. Provide the Save location for the file. By default file name will be <NUGG>Given Name.nugg
3. If you want to add single object then select ‘Add Object to Nugget’.
4. If you want to add multiple objects belonging to same package then select ‘Add Objects from a Package’.

3.1.1 (a) Adding Objects From a Transport:

1. Select ‘Add Objects from a Transport’ and provide the Transport Number and Nugget File Name and execute.


2. You will see the below screen click on continue.


3.1.2 Displaying nugget

After adding Objects to Nugget if you want to see what are all the objects added to the Nugget, Click on Display Nugget and provide the file name then execute. All the objects included in the Nugget will be displayed.


3.1.3 Importing Objects:

1. Select Import Nugget and provide the Nugget file Name and execute.


2. Check the Overwrite Originals if u want to replace the existing object with the new object and execute. Below confirmation screens will be displayed.


3.2 Using Slinkee:


Consider the scenario wherein we have to export an object from source and import the same to destination.

3.2.1 Exporting an Object:

1. Click on export object to Slinkee. Select the Object type and provide the Object name that you want to export and execute.


2. Provide the Save location for the file. By default file name will be <Object Type>_Object Name.slnk , Then you will see the below pop up.


3.2.2 Importing an Object:

1. Select import Slinkee and provide the Slinkee file Name.


2. Check the Overwrite Originals if u want to replace the existing object with the new object and execute. You will find the below confirmation screen.


References: